

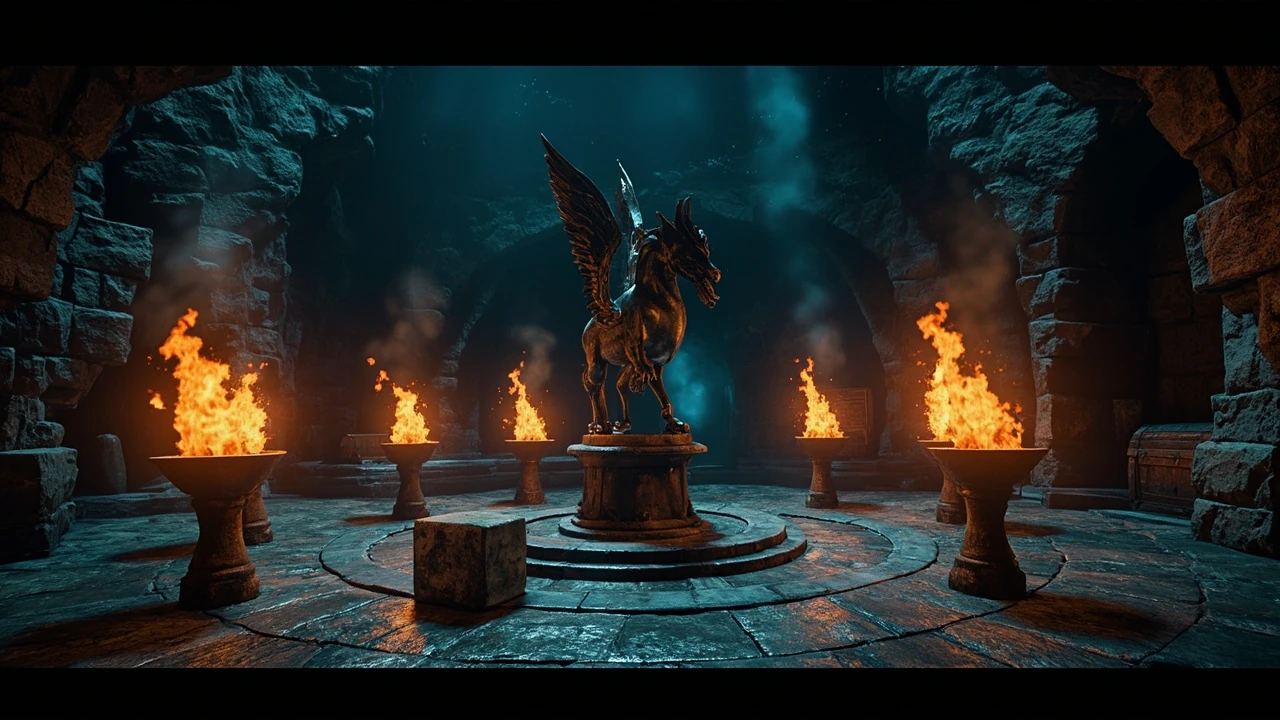

Hippogriff Marks the Spot: Hogwarts Legacy quest walkthrough and puzzle solution
Hippogriff Marks the Spot is a side quest in Hogwarts Legacy that asks the player to chain three utility spells across two small puzzle rooms, clear a short group of dark wizards, and read a clock-style brazier pattern from above to open a hidden Collection Chest. The quest is short, but the puzzle rooms are strict about spell order, and the brazier ring at the end only resolves when the player can see the full circle. The walkthrough below covers the full run from the scroll pickup outside Poidsear Castle to the Treasure-Seeker’s Gloves reward, with the exact spell interactions, the correct brazier positions, and the common mistakes that send players back to the entrance.
The quest is part of the Poidsear Coast content that players typically reach after the main story has carried them into the northern Hogwarts Valley. The geography is important: Poidsear Coast sits on the western edge of the map, Manor Cape hangs off the southern tip, and Henrietta’s Hideaway is carved into the side of a small mountain at the base of a ruined castle. Players who only know the field guide map by the floo flame icons often underestimate how much coastline sits between the start point and the hideaway entrance, so the first section of this guide spends real time on the flight path and the visual landmarks to look for.
How to start Hippogriff Marks the Spot
The first thing to understand about Hippogriff Marks the Spot is that there is no quest giver. The quest starts when the player character picks up a scroll lying on a table inside one of the small tents just outside the walls of Poidsear Castle in the Poidsear Coast region. The tent sits on the southern edge of the castle’s outer grounds, close enough that the journal entry appears as soon as the scroll is in the inventory.
Because the trigger is an interactable object rather than an NPC, the journal does not show a portrait, and there is no dialogue line to confirm that the scroll is the real start. If the quest does not activate after reading the scroll, the most common cause is that the player has not yet reached Poidsear Coast through the main story. Fast travel to the Poidsear Coast floo flame and look south from the castle perimeter to find the tent cluster quickly. The journal is also a useful sanity check: if Hippogriff Marks the Spot does not appear in the quest list after a few seconds, the scroll was probably picked up before Poidsear Coast was unlocked, and the player needs to revisit the same tent after the regional fast travel becomes available.
Players approaching Poidsear Castle for the first time should clear the outer ring before walking into the tent. The perimeter is patrolled by dark wizards and a few ranged enemies, and the interact prompt on the scroll can clip if the player reads the scroll mid-fight. Pulling the scroll in a quiet moment also keeps the loading animation from being interrupted, and it lets the player line up the next movement without a combat camera lock interrupting the quest marker.
Once the scroll is in the inventory, the journal entry Hippogriff Marks the Spot becomes available, and a quest marker appears on the map pointing south. The marker is the most reliable navigation tool for the next part of the quest, because the entrance to Henrietta’s Hideaway is easy to miss on the first approach. Players who prefer to track the quest on the world map rather than the compass should look for a small quest icon off the southern tip of the Manor Cape, well past the ruined castle outline. The icon is close enough to the coastline that it can drift over water at certain camera angles, so panning the map slowly from west to east is the easiest way to find it.
Reaching Henrietta’s Hideaway from Poidsear Coast
With the quest active, the journal points south toward the Manor Cape and a ruined castle on the southern tip of the cape. From the Poidsear Coast floo flame, the fastest route is to mount a broom or summon a Hippogriff and fly directly south along the coastline, keeping the water on the right and the cliffs on the left. The ruined castle is a small fortress on a rocky outcropping, and the entrance to the hideaway is not the front gate. The front of the castle faces inland and is collapsed, so any player who lands at the obvious courtyard will need to walk around the back to reach the side hallway that leads into the mountain.
Looking at the southern face of the ruined castle, there is a small mountain hallway set into the side of the rock. That hallway is the entry to Henrietta’s Hideaway. It looks like a narrow side passage, which is why many players walk past it on the first pass. The quest marker points directly at the gap, so following the beam of light from the marker is faster than scanning the geometry by eye. The hallway is also slightly darker than the surrounding rock because it sits in shadow from the cliff above, so players who are sensitive to contrast will spot it before players who rely on the in-game compass.
Players who struggle to identify the side hallway on the first try should drop the broom about thirty meters south of the castle and approach on foot. At ground level, the hallway reads as a darker recess between two rock faces, lit by a single torch at the threshold. The threshold torch is the visual cue that the side passage is interactable, and it is the only light source that points at the hideaway entrance from outside. The torch is small enough that it can be hidden behind a rock outcropping at certain camera angles, so the player should orbit the southern face of the castle until the torch is visible.
Once inside, the hallway opens into the first puzzle room of Henrietta’s Hideaway. The room is small, lit by a single overhead brazier, and contains the three spell interactions that the rest of the quest expects the player to chain together. The acoustics in this first room are also distinctive, with a low echo that helps players confirm they are in the right chamber before the quest marker updates. Players who hear the echo and see the overhead brazier are in the correct room; players who see the overhead brazier but do not hear the echo are usually looking at a different side passage that leads to a dead end.
First puzzle room: lighting the block and opening the inner door
The first chamber of Henrietta’s Hideaway contains a small puzzle that combines three spells. On the left side of the room is an unlit brazier sitting on a low platform. Casting Confringo on the brazier triggers a transformation: the platform reveals a movable puzzle block, which is the key to the room’s progression. The block is roughly the size of a small chest and has a faint rune on the top face, which is the surface the player needs to keep oriented upward when lifting it.
The block must be lifted with Wingardium Leviosa and placed on the circular metal area that already has a flame burning on it. The metal area is the only lit disc in the room, so the target is not ambiguous. Once the block is set in place, the second step is to cast Confringo on the block itself. This lights the block and changes the room state, turning the previously dim chamber into one where the next part of the puzzle becomes readable. The block also emits a small heat shimmer after it is lit, which is a useful visual confirmation that the cast registered.
The final step of the first puzzle is to cast Glacius on the purple square that sits on the icy circle near the back of the room. Glacius freezes the square, and the frozen state causes a hidden door to slide open. From here the player can also grab a small treasure box on the right by casting Confringo on the second extinguished brazier in the room, which is a useful side reward for completionists who want every collectible in the hideaway. The treasure box is small enough that it does not appear on the world map, so the only way to know it is there is to read the room carefully before leaving.
The reason this puzzle matters for the rest of the quest is that it teaches the three core utility spells the second puzzle also expects. Confringo, Wingardium Leviosa, and Glacius are the same trio used in many Hogwarts Legacy puzzles, and learning to chain them in this small chamber saves time in larger dungeons later. Players who already know the spell wheel layout can cast all three without opening the field guide page, which keeps the puzzle flow tight. The first room also acts as a soft tutorial for the second room’s brazier logic, because the lit and unlit states of the two braziers on the left and right side of the room mirror the pattern that the statue room later asks the player to read from above.
Combat encounter between the two puzzle rooms
After the hidden door opens, the player steps into a small arena with a fixed spawn of dark wizards. The encounter is short, but the placement is deliberate: the wizards have line of sight to the door, so the player cannot enter stealth without using a specific spell or potion. Standard dark wizard tactics apply, including shielding, dodging, and using basic casts for damage. The arena has two support columns that can break line of sight, and the player can use those columns to split the group before committing to a full combo.
Because the room is small, area-of-effect spells are effective, and blocking at the right time prevents most incoming damage. A well-timed Ancient Magic throw clears the group quickly if the player has built a meter before entering, and Protego is reliable for the heavy cast that one of the wizards always opens with. Players who rely on the basic cast combo can also burn the group down with two or three Incendio or Confringo chains, since the room is tight enough that the spells rarely miss. The dark wizards also have a tendency to cluster around the back column, which makes Confringo’s splash damage more effective than a precision build that depends on headshots or critical hits.
There is no optional objective in the combat room, so the goal is to defeat every enemy and unlock the second puzzle. Once the last wizard falls, the door at the back of the room opens, and the path to the Hippogriff statue is available. The chamber beyond is larger and brighter, with a stone floor and a clear view of the statue from the entrance. The lighting in the statue room is also different from the first room: the braziers around the statue are arranged in a full ring, and the overhead lighting is dim enough that the flame state of each brazier reads clearly from the entrance threshold.
Second puzzle: the Hippogriff statue brazier pattern
The second puzzle is the one that gives the quest its name. A bronze Hippogriff statue sits on a circular pedestal in the center of the larger chamber, surrounded by a full ring of stone braziers. Looking down on the statue from above, the player must light specific braziers and extinguish others to reveal a Collection Chest behind the statue. The statue itself is roughly the size of a small carriage, with the hippogriff’s wings folded back and its head turned slightly to the right; this orientation is consistent on every platform and is what the clock pattern references when the player is trying to identify the 12 o’clock position.
The correct pattern is to light the braziers at the 12 o’clock, 3 o’clock, 4 o’clock, and 9 o’clock positions, and to extinguish every other brazier in the ring. Confringo lights a brazier, and a basic cast or an ice spell such as Glacius or a basic attack extinguishes one. Casting the wrong spell on the wrong brazier does not reset the pattern as obviously as players expect, because each brazier can be in one of three states: lit, unlit, or extinguished. The difference between unlit and extinguished is the part that trips up most first-time players, because the visual difference is subtle until the player looks at the brazier from above.
The reason the puzzle must be read from above is that the 12, 3, 4, and 9 o’clock positions only resolve when the player can see the full circle. Approaching the puzzle at ground level looks like a random pattern of unlit braziers. Flying above the statue on a broom, or climbing onto the upper balcony that overlooks the room, is the fastest way to map the pattern correctly. The balcony is on the right side of the chamber as the player enters, and it has a clear view of every brazier in the ring. The balcony also has a small set of stone steps that lead back down to the floor, so the player can step off the broom onto the balcony without dropping into the puzzle area.
Players who struggle with the pattern should treat the puzzle as a clock dial first. Identify the 12 o’clock brazier at the back of the room relative to the entrance, then count around the circle. The 4 o’clock position is the one most often misread, because it is easy to confuse with 5 o’clock when the player is standing at floor level. Lighting 5 o’clock instead of 4 o’clock leaves the pattern unresolved, and the chest stays hidden until the player corrects the position. A useful trick is to light the 12 o’clock brazier first, because it is the easiest to identify, and then work around the circle one position at a time until the four correct braziers are lit.
Once all four correct braziers are lit and every other brazier in the ring is extinguished, the pedestal behind the statue shifts and a Collection Chest appears. The chest is the same type used in other exploration quests in the Poidsear Coast region, and the interaction is a single button press. The pedestal also emits a low rumble when the pattern resolves, which is a useful audio cue for players who are still hovering above the statue and may not be able to see the chest at the back of the room.
Reward: the Treasure-Seeker’s Gloves
Opening the Collection Chest completes the quest Hippogriff Marks the Spot and rewards the player with the Treasure-Seeker’s Gloves, a cosmetic apparel item that changes the appearance of the character’s hands. The gloves are part of a small set of cosmetic items that Hogwarts Legacy ties to exploration quests, and they have no combat or stat effect. The gloves have a leather cuff with a small brass buckle and a darker palm panel, which is the visual cue that the item is equipped even when the character is in a cutscene.
The Treasure-Seeker’s Gloves are visible in the gear screen under the apparel slot, and they can be equipped or removed at any vanity mirror. Players who want the full cosmetic set should keep an eye on related side quests in the Poidsear Coast and Manor Cape regions, because several other treasure-hunting quests follow the same scroll, puzzle, chest pattern that this quest introduces. The gloves also count toward the collectible counter on the field guide page for the region, and the field guide page updates immediately after the chest is opened, so the player can confirm the collectible is registered without leaving the hideaway.
Because the reward is cosmetic, players can safely skip the quest if they are focused on a strength or spell build. Players who want every collectible, or who enjoy the puzzle design, should treat the quest as a good example of the small environmental puzzles that Hogwarts Legacy uses to break up combat encounters in the open world. The gloves are also a small visual marker for time spent in the hideaway, which is part of why the reward feels appropriate for the length of the quest rather than underwhelming.
Quest progression checklist
The checklist below summarizes the full quest flow so a player can run it in a single pass without missing a step. Each step is short on purpose, because the puzzle rooms reward players who already know which spell to cast before they enter.
- Travel to Poidsear Coast and reach Poidsear Castle.
- Pick up the scroll in the tent just outside the castle walls to start Hippogriff Marks the Spot.
- Fly south to Manor Cape and the ruined castle on the southern tip.
- Enter Henrietta’s Hideaway through the small hallway on the side of the mountain.
- Cast Confringo on the left brazier to reveal the puzzle block.
- Use Wingardium Leviosa to place the block on the lit circular metal area.
- Cast Confringo on the block to light it.
- Cast Glacius on the purple square on the icy circle to open the inner door.
- Optional: cast Confringo on the second extinguished brazier to collect the small treasure box on the right.
- Defeat the dark wizards in the inner chamber.
- Approach the Hippogriff statue from above and read the brazier ring like a clock.
- Light the 12, 3, 4, and 9 o’clock braziers with Confringo.
- Extinguish every other brazier in the ring.
- Open the Collection Chest behind the statue to claim the Treasure-Seeker’s Gloves.
Spells and items to prepare before entering
The quest is not long, but entering Henrietta’s Hideaway without the right spells forces a retreat and a fast travel back to a classroom. Below is the practical loadout that covers every spell interaction in the two puzzle rooms plus the combat encounter.
- Confringo: required to light the first brazier, light the puzzle block, and light the 12, 3, 4, and 9 o’clock braziers in the second puzzle.
- Wingardium Leviosa: required to move the puzzle block onto the metal disc in the first puzzle.
- Glacius: required to freeze the purple square in the first puzzle and useful for extinguishing mislit braziers in the second puzzle.
- Protego: required for the dark wizard heavy cast in the inner chamber.
- Basic Cast: a reliable way to extinguish stray braziers without burning spell focus.
- Focus Potion or Wiggenweld Potion: optional but useful if the player plans to clear the room with a single Ancient Magic throw.
The three puzzle spells are learned during the main story well before the player reaches Poidsear Coast, so any character that has progressed past the Charms classroom can complete this quest without returning to the field guide page. Players who want a cleaner spell wheel can also bind Confringo, Wingardium Leviosa, and Glacius to the four directional slots so the puzzle runs without pausing to open the full spell list. Players on PC can also bind the spells to mouse buttons, which is faster than the directional slots for the short Confringo chains in the statue room.
Common mistakes and how to avoid them
Most failed runs of Hippogriff Marks the Spot come from one of four small mistakes. None of them are bugs in the quest, so recognizing the pattern in advance saves time inside the hideaway.
- Missing the tent scroll: the scroll is on a table, not on the ground, and the interact prompt can clip if the player runs past at sprint speed.
- Walking past the side hallway: the entrance to Henrietta’s Hideaway is on the side of the mountain, not the front of the ruined castle, so following the quest marker strictly is faster than reading the geometry.
- Forgetting to extinguish braziers: lighting the four correct braziers is only half the pattern, because the others must be extinguished, not just unlit.
- Reading the brazier ring from ground level: the clock positions only make sense from above, so climbing the balcony or hovering on a broom is faster than trying to solve the puzzle at floor height.
If the player leaves the hideaway mid-puzzle and returns, the brazier pattern resets, which is the expected behavior. There is no checkpoint inside the hideaway, so the puzzle rooms must be solved in a single run. Players who want to break the quest into two sessions should at least clear the first puzzle and the combat room before leaving, so the return trip only requires the second puzzle. The reset behavior also applies to the first puzzle room, so the puzzle block reverts to its hidden state every time the player exits the hideaway.
Another common issue is spell wheel lag on the Nintendo Switch version, where the spell selection can take a beat longer than on PC or current-gen consoles. Binding the three puzzle spells to the directional slots reduces that delay and keeps the puzzle rhythm consistent with the rest of the quest. Players on handheld mode are especially affected, because the spell wheel opens with a longer animation in that mode than in docked mode.
How the quest fits the broader Hogwarts Legacy design
Hippogriff Marks the Spot is a good example of the side quest structure Hogwarts Legacy uses throughout the open world. A short discovery hook in the form of a scroll leads to a small dungeon with two puzzles, a combat encounter, and a single reward. The reward is cosmetic rather than a stat item, which keeps the side quest loop feeling exploratory rather than mandatory. The structure also matches the developer’s broader approach of using side quests to teach utility spells in context, so even quests that look optional contribute to a player’s overall familiarity with the spell wheel.
For players who enjoy the puzzle design in this quest, the same loop appears in several other exploration quests scattered across the map. Each one introduces a small new mechanic, such as a different brazier count, a different required spell, or a different vantage point, but the underlying pattern stays the same. Learning the pattern in Hippogriff Marks the Spot reduces the time needed to clear similar quests later, and the brazier clock pattern in particular recurs in a few of the larger Merlin Trial puzzles. The clock pattern is also reused in two of the northern Hogwarts Valley side quests, so the time spent learning it here pays off across multiple regions.
From a design perspective, the quest is also a useful case study for how Hogwarts Legacy teaches utility spells in context. The first puzzle uses Confringo, Wingardium Leviosa, and Glacius together, and the second puzzle uses the same trio to teach clock-based spatial reasoning. Players who finish the quest have practiced every core utility spell the game expects them to use in larger dungeons, and the cosmetic reward gives a small visual marker for the time spent in the hideaway. The pacing is also deliberate: the first puzzle is a low-stakes introduction, the combat encounter is a short reset, and the second puzzle is the test of whether the player actually internalized the spell logic from the first room.
Navigation tips for the Poidsear Coast approach
The Poidsear Coast approach to the ruined castle is one of the more scenic flight paths in the region, but it has a few navigation quirks that catch first-time players. The coastline curves east before turning south toward the Manor Cape, and a small fog bank often sits over the water near the cape tip, which can hide the ruined castle for a few seconds of flight. The fog bank is dynamic, so the player cannot rely on the same visibility window on every attempt; some runs the castle is visible from fifty meters out, and other runs it stays hidden until the player is nearly on top of it.
Players flying a broom should stay above the cliff line until the ruined castle comes into view, then drop toward the southern face to find the side hallway. Flying low over the water before the cape is in sight tends to push the player past the castle, because the fog bank blends with the rock color. The Hippogriff mount is faster on the open water but less precise near the cliffs, so switching to a broom for the final approach is the smoother option. The Hippogriff also has a tendency to land on the front courtyard of the ruined castle, which is the wrong entrance, so the player should dismount before landing and glide the last few meters to the side hallway.
Players who prefer to fast travel should note that there is no floo flame directly at the ruined castle. The closest flame is the Poidsear Coast flame, which means a short flight or a long run south along the coast. The Poidsear Coast flame is also the only practical resupply point for potions and edible food before entering the hideaway, since there is no vendor inside the dungeon. Players who plan to chain this quest with other Poidsear Coast content should stock up at the Poidsear Coast flame before flying south, because the closest alternative vendor is back near the Feldcroft region.
Quest summary table
The table below summarizes the key facts a player needs to complete Hippogriff Marks the Spot. Use it as a quick reference when the journal entry is open in the middle of the dungeon.
| Quest element | Detail |
|---|---|
| Quest name | Hippogriff Marks the Spot |
| Region | Poidsear Coast, with travel to Manor Cape |
| Quest start | Scroll on a table in a tent outside Poidsear Castle |
| Dungeon | Henrietta’s Hideaway, entered through a small side hallway in the mountain |
| Spells required | Confringo, Wingardium Leviosa, Glacius |
| Combat | Short dark wizard encounter between the two puzzles |
| Second puzzle pattern | Light 12, 3, 4, and 9 o’clock braziers; extinguish the rest |
| Reward | Treasure-Seeker’s Gloves (cosmetic apparel) |
| Quest type | Side quest, exploration focused |
Spell and puzzle interaction table
The second table maps each spell to the exact object it interacts with inside Henrietta’s Hideaway. This is the most common lookup players need when they enter the hideaway the first time.
| Spell | Object | Result |
|---|---|---|
| Confringo | Left brazier in the first room | Reveals the puzzle block on its platform |
| Wingardium Leviosa | Puzzle block | Lifts the block so it can be placed on the lit metal disc |
| Confringo | Puzzle block on the metal disc | Lights the block and changes the room state |
| Glacius | Purple square on the icy circle | Freezes the square and opens the inner door |
| Confringo | Right extinguished brazier (optional) | Reveals a small treasure box on the right side of the room |
| Confringo | Braziers at 12, 3, 4, and 9 o’clock in the statue room | Lights the correct braziers in the Hippogriff statue puzzle |
| Glacius or Basic Cast | Stray lit braziers in the statue room | Extinguishes mislit braziers so the pattern resolves |
Frequently asked questions
Where do I start Hippogriff Marks the Spot?
The quest starts by picking up a scroll on a table inside one of the tents just outside Poidsear Castle in the Poidsear Coast region. The quest journal activates as soon as the scroll is in the inventory, so there is no NPC to talk to and no portrait to accept the quest from.
Do I need any specific spells for Hippogriff Marks the Spot?
Yes. The quest requires Confringo, Wingardium Leviosa, and Glacius. All three are core utility spells learned during the main Hogwarts Legacy story, so any character that has reached Poidsear Coast will have them available without visiting a classroom.
How do I get into Henrietta’s Hideaway?
Fly south from Poidsear Castle to the Manor Cape, then look for the ruined castle on the southern tip of the cape. The hideaway entrance is a small hallway on the side of the mountain, not the front of the ruined castle. The quest marker points directly at the gap.
What is the correct brazier pattern for the Hippogriff statue?
From above, light the braziers at 12 o’clock, 3 o’clock, 4 o’clock, and 9 o’clock with Confringo, and extinguish every other brazier in the ring. The hidden Collection Chest appears behind the statue once the pattern is correct.
What do I get for completing Hippogriff Marks the Spot?
Completing the quest rewards the Treasure-Seeker’s Gloves, a cosmetic apparel item that changes the appearance of the character’s hands. The gloves have no combat or stat effect.
Is there a combat encounter in the quest?
Yes. After the first puzzle, the player enters a small chamber with a fixed group of dark wizards. The encounter is short, but the wizards have line of sight to the door, so the player should prepare a blocking spell and a basic combo before entering.
Can I leave the hideaway and come back?
Yes, but the brazier pattern in the second puzzle resets when the player leaves the chamber. There is no checkpoint inside Henrietta’s Hideaway, so the puzzle rooms must be solved in a single run.
Is there an optional reward in the first puzzle room?
Yes. After opening the inner door, the player can cast Confringo on the second extinguished brazier in the first room to reveal a small treasure box on the right side of the chamber. It is a useful side pickup for completionists who want every collectible in the hideaway.
Is the Hippogriff Marks the Spot quest available on every platform?
Yes. The quest is available in Hogwarts Legacy on PC, PlayStation 4, PlayStation 5, Xbox Series X and S, and Nintendo Switch. The puzzle mechanics, brazier pattern, and Treasure-Seeker’s Gloves reward are identical across platforms.
What level should I be to start Hippogriff Marks the Spot?
The quest does not enforce a specific character level, but the dark wizards inside the hideaway scale with the player’s progression. A character that has already cleared the main story encounters in Poidsear Coast will have no trouble with the combat room.
Leave a Reply